Showing posts with label How To. Show all posts

Sunday, 5 July 2015

I Believe in Pink...

" I believe in pink. I believe that laughing is the best calorie burner. I believe in kissing a lot. I believe in being strong. I believe that happy girls are the prettiest girls. I believe that tomorrow is a new day and I believe in miracles."- Audrey Hepburn

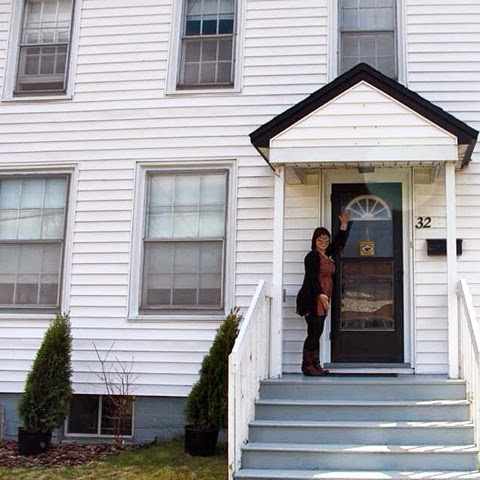
Pink. Every single person who knows me assumes my favourite colour in the whole, wide, world is pink. Why? Because the front door of my house would make Barbie envious. It is the pink that every little girl wishes she was allowed to paint her bedroom. It packs a punch and nearly blinded all of my neighbors when I painted it (it had always been traditional black). I have a confession, pink is not my favourite colour. I don't really have one, I love mustard yellow, mint green and turquoise. I love black clothing, peach blush, white tulips and red shoes (...and red wine). The only time I opt for pink is when I am buying or applying lipstick. Nothing in my house is pink, it is all greys, blues and mints. I painted my door pink 'cause I wanted something modern on an otherwise traditional house. A pop of character.

The problem with painting your door pink (and really, it's the only problem) is that you then have to decorate the exterior with complimenting colours. Traditional red and green Christmas wreaths clash, flower choices look best when they are pink and white. This year I opted for the first time to not buy hanging baskets. My front step is breezy and they just dry out so fast, it is almost impossible to keep up with their thirst. Instead I filled my flower pots with begonias, impatiens and dusty miller and I filled my window boxes with corn flowers and sweet peas. It looks lovely, but without the hanging baskets, a little something is missing.

As a rule I hate fake flowers. No offense to anyone, but they never look authentic and they are dust magnets. The only time fake flowers are acceptable is if and when you live in the Arctic tundra, or somewhere fresh flowers don't grow and aren't readily available (I swear, I am not opinionated). They are also OK in flower crowns because let's face it, flower crowns are gloriously fun. Today I broke my rule. I bought a grapevine wreath for six dollars at a craft store and half a dozen bright pink silk (gah!) flowers to affix to it. I don't know what possessed me. But with a little hot glue and some strategic placement of the fake (sigh...) flowers, I ended up with a pretty cute little focal point for my bright pink door. The wreath cost a total of eight dollars taxes in and you can find pictures of my adventure to the dark side of fake flowers below!
Happy crafting/beautifying !
ps. first time not using my iphone and using my fancy camera, hence the kitty at the end!
-m


Sunday, 24 May 2015

Flowers Can't..


"Flowers can't solve all problems, but they're a great start"-Justina Blakeney

A couple of weeks ago I was browsing through Chapters bookstore, which I do frequently. I had a coffee in hand and was admiring all of the beautiful housewares that I can't afford but that I continue to lust after. I had made it past all of the new released books, past the greeting cards and past the decadent rows of soy candles. I was turning the corner to inspect some tableware when something caught my eye and made me (almost) spit out a mouthful of coffee. It was a small box labelled "DIY Flower-Pot" and it said it contained everything you would need to paint your very own flower pot. On inspection it included a very small terracotta pot, some paint and a brush, all for the remarkably high price of $19.99.

I grew up painting flower pots, my mom sold them at craft fairs and both my sister and I had all of our pencils, markers and stationary on display in our own, hand-painted terracotta pots on our desks. I knew it was an inexpensive feat but didn't realise how ridiculous the price was for that DIY kit until my sister and I decided to get back to our "roots" and spend one of her first nights back in the city (she was away at university learning law and stuff) drinking wine and crafting some flower pots.

After securing some full-bodied red wine at the liquor store, our next stop was at the dollar store where we picked up sponge brushes (5 for $1), small terracotta pots (3 for $1.25), small saucers for said pots (3 for $1), a large bottle of white acrylic paint ($1) and a bag of sour candies ($1).  Unfortunately the dollar store didn't have the array of paint colours we were hoping for so we bombed across the street to an actual craft store where we bought neon pink and robin's egg blue acrylic paint ($1.25/ bottle) and a sealer/glaze for the pots to make sure they were both water-proof and that the paint stayed where we put it ($3.00).

We came home, covered the dining table in newspaper and got down to business. We each painted three pots, each pot got three coats of paint (FYI if using a light colour or a neon colour, paint a coat of white under where you intend to use it, this will make it more dramatic and will allow it to cover better). The sponge brushes worked surprisingly well and it took about an hour including a little drinking and devouring of sour candies to complete all three coats (they dried remarkably fast!). I let them cure for a couple of hours before I finished both the inside and the outside of each pot with one coat of the sealing glaze. The next day they were ready to be put to good use.

Shall we do a tally?
       $1.25 for three pots
       $1.25 for three pots
       $1.00 for three saucers
       $1.00 for three saucers
       $3.50 for paint
       $1.00 for brushes
    + $3.00 for glaze     
       $12.00+tax  (~$13.80)

So without including the wine and candies, it cost $13.80 to paint six pots...that is $2.30/pot which makes the DIY kit a real rip-off. Happy pot painting all, enjoy getting your hands a little dirty!
-m


Sunday, 14 September 2014

I Believe In Love At First Sight For Houses..

"I believe in love at first sight for houses, not for people."- Danielle Steel

I do not believe in love at first sight, at least when it comes to houses. I saw about fifty. One of the fifty I maybe kind of loved but being out of my price range it was more like lust than love. My little house had a lot of "potential" when I bought it. It was filthy, unloved and beige. The entirety of the house was beige/yellow with the exception of a superbly bland, white and black exterior. My 80+ year old grandmother, who is wise, stylish and full of good taste told me it was a mistake. That it was a "money pit". She couldn't see the potential. I must admit, I have questioned the "potential" a lot myself, including on the day I took possession. Good things take time and luckily time is something I have a lot of.

In today's modern world, a world where most house hunting happens on line, curb appeal is important. With over saturated housing markets, any future home owner scans dozens of listings before they narrow down their few favourites that they may want to see in person. Without curb appeal, a house can quickly be overlooked. I am convinced that is one of the main reasons I was able to land my house. The poor beast was overlooked. Curb appeal can not only increase the value of your home, but it can increase the value of your neighbour's homes. Happy neighbours are wonderful things!

To increase my curb appeal I did four very inexpensive things. They included painting my door a punchy colour and tearing off the horrible storm door (the one that kept catching my heels!). I put up shutters, window boxes and did a teensy, tiny bit of gardening (which includes flower pots).  I figure everything cost less than $200 total and the change is dramatic. It amazes me how the little things make a huge difference!

This is my little house on the day I bought her, look at how naked and sad she looks!


Adding shutters reminded me of the change you see in a persons face when they go from having no eyebrows to painting them on. They frame your face and make your eyes "pop". Only problem was that shutters wouldn't fit on my lower windows, they were too close together...sigh.. The six shutters on the top cost $66.00. Thankfully my dad was around to help me put them up! Painting the door cost as much as a gallon of paint!


This is where the window boxes came in. They balanced the black on the top and evened everything out! Plus they will be so fun to decorate with evergreen boughs and Christmas garb in December! These were a gift from my dad (he is the best!) but I am certain they cost no more than $100 to have made. 


Tahhhh-dahh! Xo

Tuesday, 5 August 2014

A Good Deal Is Only A Deal..

I"A good deal is only a deal when you actually need it ." Nanny lecturing my Papa

I have many qualities and some are more endearing than others. One of the least endearing ones is how much I love the thrill of a sale. Yes, I said a thrill. Not much can make me happier than getting an amazing deal on something I need. I will wait and scour and wait and scour for the perfect price. Don't get me wrong, I am not cheap and have no problem paying full price for something. I really do believe there are certain things you should not be looking to get a good deal on and those would include a hair cut and furniture (often times you do get what you pay for!). I also believe that buying fresh local produce is worth every penny. My general mindset is why pay someone for something you could do yourself and why pay full price when you can wait and get it on sale.

Why am I telling you this about myself? Well I took a risk this week that could have gone either way. This risk was taken due to an incredible price on a can of paint. I have needed to paint my final spare room since the day I moved in. It was the only room I didn't paint and the only room that was stuck in a boring, beige funk. When I moved in it was the best colour in the entire house and although I am not really a fan of neutral beige, it won by a long shot over the rusty brown and nicotine yellow that danced upon all of the other walls in the house. My plan had been to paint that room a light, airy grey. I even had the colour picked out and the swatches taped to the wall but the little make-over kept being pushed to the side as one project popped up after another. This week I was at Kent looking for Adirondack chairs and hoping they would be on sale (see it is a disease...) when I wandered through the paint isle and noticed a mis-tint . Now a mis-tint is a can of paint that was tinted wrong by the paint machine. It is never a true colour and therefore can't be replicated and a swatch can not be found to see what it may look like on a wall. Because of all of this they are usually half price. Mis-tints generally go for $20, which is a great deal if you are looking for a very cheap face lift (and let us be honest, paint is cheap to begin with!) but most of the times the colours are hideous. Well this can was $7. Yes, $7. That is the price of a grande' latte at Starbucks. It was what appeared to be a robin's egg blue and it was a paint and primer in one which was a $55 can of paint. Clearly my disease of good deals would not let me leave it there. Even though it was not at all what I wanted I figured it had to beat beige and if I hated it, it was a little time and $7 wasted.

Now I must remind you at this point that it is August. August on the East coast is humid and muggy and there is very little air circulation in older homes (like mine) that have the windows propped up with old books and pieces of dowel. To say I was sweaty and hot after painting my basically free paint on the walls is an understatement. When I left the room 2 hours and two coats of a bright blue later I looked as if I had jumped into the shower fully clothed (and not in the attractive way, if there is an attractive way to do that!). I must confess I waited an entire day to look at the finished room. It was brighter than I anticipated from the the little thumb print of dried paint on the top of the lid. In day light and with the room put together I surprisingly  love it. It was the best $7 I have spent in a long time and potentially the cheapest update my house has had to date. The next time you are in the paint section at your favourite hardware store make sure to check out the mis-tints, you may find what you didn`t know you were looking for!
-m

Before....


After...


Sunday, 20 July 2014

I Advise Keeping Four Feet On The Floor...

"I advise keeping four feet on the floor and all hands on deck."- Anne Launders

As I type this I have a chai tea in hand, there are stars in the sky and I am cuddled up with a blanket on my deck. Sounds peaceful right? Things are good around here, my deck and I are old friends again.

One week ago my deck and I were not friends, we were hardly even acquaintances. I was fumbling with a book of matches and with the idea of putting myself and my deck out of our misery (but arson is a felony and my insurance probably wouldn't have accepted insanity as my plea). All I can say is that the people who built the deck and then chose to very sloppily apply a brown solid stain were lucky I didn't know where they currently live. They would have had a burning poop bag on their front porch to say the very least. Solid stain the the worst. It peels, it rubs off and eventually it needs to be scraped and/or stripped. I plead with you fellow deck owners. We are in this together and although solid stains look "right some nice" when they are fresh and new, they quickly turn into the spawn of Satan and what will soon become the bane of your existence. My deck should have been stripped and stained the year I moved in but it was just such a big under taking that I kept putting it off. Finally I could no longer stand the look of it and I put my foot down on my inner procrastinator. "It won't be that bad.." I told myself. "A few hours work and it will totally be worth it"...my pep talk included. My inner cheerleader was so wrong. I can honestly say that painting my entire house; trim, ceilings and all was a walk in the park compared to revitalising my poor back deck.

What I did was I bought a deck revitaliser and stripper in one. It was made by Thompson's Water Seal. I brushed it on and then let it sit for five to ten minutes allowing it to work it's magic on the old rotten solid stain.  I then pressure washed it all. This took approximately ten hours (but who is counting). The floor came up easily, it was the rungs that gave me a hard time. Next I had to sand (I chose to use my handy palm sander...the rotor dug into the wood!) the rungs to get off the rest of that stubborn stain. This took about four hours (again, I wasn't counting..). Next I went to home depot and had a horrible time deciding on what to use to finish it. Ultimately I would have preferred to use just clear sealer but because the knots in the wood seemed to have a death grip on the old dark stain I chose a transparent stain and water sealer in one. Deck stains come in solid, semi transparent, transparent and clear. I wanted something I would never have to strip off again and something that would protect the wood. I went with Thompson's Water Seal again and I chose the colour "honey", hoping it would make the knots less apparent while giving the deck a uniform appearance. I made the right choice but again fellow deck owners, I urge you to just use a clear waterproofer if your deck is new or untreated. Let your decks naturally turn grey while protecting them. Low maintenance is good my friends. Staining the deck took a full day.

Although I complained and yes it was the worst project to date, I am so happy with how my little deck turned out. Water beads on it and it looks mighty fine if I do say so myself. You would never know the deck it six years old. If I continue to treat it every few years it should last me for many more to come. I must be getting old if decks are so high on my priority list....sigh. Happy rejuvenating all.
-m

Before......


Stripped and bare....


What I used...

Going on and then finished !


Friday, 20 June 2014

Sometimes The Dustiest Cover...

"Sometimes the dustiest cover hides the best book. Sometimes the best cup is chipped."-Once Upon A Time

There is nothing worse than chipping your dinnerware. Well, that is a lie. There are so many things worse than chipping a mug or a plate that I wont even get into them because that list is probably endless. It is however, very frustrating, especially when it happens to be your all-time-favourite coffee mug. The mug that you use every single time you have coffee in the morning and the same mug you enjoy your sleepy-time tea in before bed. It is even more frustrating when you have no idea how or why that little chip happened. It is as if the magical little Chip Fairy danced herself into your kitchen when you were asleep and wreaked havoc. What is one to do with all of these lovely pieces of broken porcelain? I personally, have a horrible time throwing them out. I tend to put them under my sink (I really, truly am not a hoarder) to save for some unknown purpose.

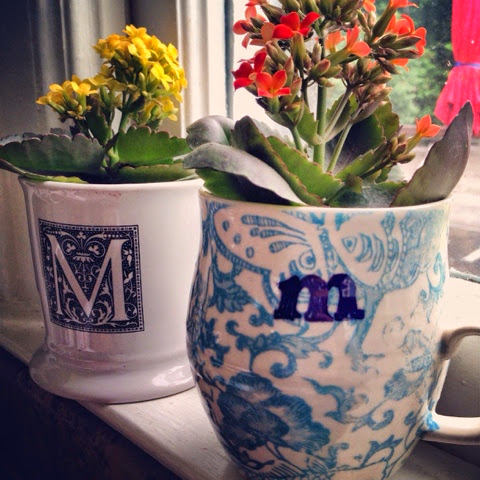
Today I was under my sink looking for paper towel when my I noticed three of these ill-fated mugs collecting dust. I pulled them out, washed them up and decided they deserved a purpose. I went to a local greenhouse with a plan to purchase some succulents (they are so trendy and modern right now!). Turns out succulents are hard to find in Nova Scotia, so I settled on some waxy little flowers in bright colors. I took them home, threw a little gravel in the bottom of my mugs, transferred the flowers and topped them off with some good quality potting soil. They look adorable and you can't even see the chips! They have already made washing dishes in my sink more enjoyable! Happy up-cycling all, save all those cute tea cups and coffee mugs to make yourselves a windowsill garden.
-m


Sunday, 25 May 2014

It Is Easily Overlooked....

"It is easily overlooked that what is now called vintage was once brand new.."- Tony Visconti


I love to thrift. Thrift stores, yard sales and roadside garbage retrievals give me a thrill. Records, old furniture, vintage dresses and costume jewellery are among my favourite things! Classic pieces have grace and class that is hard to find these days and nothing, I mean notta, was made of rinky dink press board back in the day. Solid wood baby, dove tail joints and scrolly details unparallelled. I guess I am just an old fashioned kind of girl.

I often make a point to make runs to the "Sally-Ann" and yesterday after very little post night shift sleep, I bombed off to value village with a plan to make some cake plates out of vintage dishes. Nothing spoke to me; that is until I was paroozing among the costume jewelry. A couple of vintage broaches caught my eye and at three for five dollars, I really couldn't leave them there. I had to bring them home and make good use of them.

After a glass of wine and a tiny bit of not-so-careful consideration, I gathered some crafting hair clips and some Goop (seriously the BEST adhesive on the face of this earth, that shit will make anything stick forever and ever amen..). I used my badass wire cutters/pliers to snip and pry the pin backings off of the two lovely vintage broaches. Then I decided where to place the clip on the back considering how to keep them from eyes view as well as which direction I would like the broach to sit in my hair. Using Goop (with the windows open, that stuff is stanky), I adhered the clips to the back of the broaches and allowed them to dry overnight. It was exactly a five minute and six dollar project. Quick and dirty but yielding adorable results that have an unexpected quirky flair. They give my short crop a little bit of feminine edge and I will be keeping my eye out for more in the future.

Happy upcying!
m

ps. You can use anything, buttons would be equally as adorable as would broken pieces of vintage tea cups and saucers (that will be my next project!)


Saturday, 29 March 2014

Sugar, Sugar...

"Pour a little sugar on it honey, pour a little sugar on it baby..."- The Archies

I am soon to be travelling down south for a wedding and after a long, cold, dry winter, my skin is in need of both some bad ass moisture and some intense exfoliation. I recently hunted for the perfect "miracle body scrub" and after visiting a few stores, I was hit with an idea. Why spend money on something that may or may not work when I have raw sugar and coconut oil in my pantry?

Coconut oil is big right now. Not only is it a healthy, organic oil to cook with (which is why I keep it) but it also has approximately 1561 other uses (this may or may not be an exaggeration that I may or may not have pulled out of my rear end...).  It has anti-microbial properties and is a wonderful moisturizer for your body, lips and even your hair. I know people who use it to remove eye makeup and people who use it as a healthy source of good fat. You can even use it to season cast iron pans! Like I said, it is big right now and for good reason.

My body scrub took a little bit of trail and error to find the right ratio of ingredients but it was more than worth being a mad scientist in my kitchen. I couldn't be happier with results, my legs are smoother and softer than they have ever been. Package it all up in a little mason jar and tie on a little ribbon or use some cute-sy fabric on top and you have a lovely, hand-made gift that will leave your friends feeling pampered and special. Recipe below! Happy exfoliation all!
-m


Coconut-sugar body scrub..

In a small mixing bowl combine 1.5 cups of raw brown sugar (regular brown sugar would work too!) and six tablespoons of melted coconut oil (not hot, just barely melted!). Mix thoroughly and take a sniff (it's smells soooo good). If the dreamy smell of sweet coconut is not for you, you can always add a few drops of an essential oil to your liking (lavender would be the bomb-diggity). In an air tight container this should last for six months or so. Tips- apply in a circular motion to damp skin and be sure to rinse your tub afterwards. Coconut oil is slick on the bottom of a tub and we don't need head injuries now do we?